
For once I thought of taking some photos while I was painting, so here it is - a little step by step of how I paint these guys. Click the images to see them in a larger size.

1. I start with the first light washes, very diluted, making sure to leave white areas white. Everything that´s not supposed to be white in the end gets this first wash.

2. After the first wash dries, I go on with slightly darker washes. In cases like this, when I´m working at home, I help the washes to dry with a hair dryer. I´m too impatient to wait for them to dry...

3. I keep adding darker washes, trying to keep in mind that the light in the image comes from above, so the man´s shoulders and the top of his hat should be slightly lighter than the rest. I found some of the darker marks got a bit too dark here, so I softened them with a brush with clean water after I took this photo. The spattering happens sometimes when I lift a very wet brush a little too hastily so the tip kind of throws some colour off. It´s easy to avoid by taking it a bit slower, but I kind of like those little accidents.

4. In the end I add some more darks and details, trying to find some kind of balance in the picture. This is pretty much the finished state.

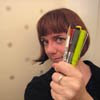
5. I don´t like working with tiny brushes, it´s so easy to get caught up in details if you do. Here are the two brushes I use for these working men series, the smaller one is a Winsor & Newton Sceptre Gold II no.9, the larger one is an all time favourite, an old Kolinsky sable brush. I´ve had it for at least ten years and all the writing on it is gone, so I don´t know what size it is. I only use the smaller one towards the end, for tweaking details, I try to do as much as I can with the bigger brush.
The image is 10 x 15 cm (3.9 x 5.9 inch) wide, for comparison.
10 x 15 cm, pencil and watercolours on Canson Montval watercolour paper, rough grain.

12 comments:
This is very interesting to see. I really like the freshness and immediacy of your watercolors so it is fascinating for me to be able to follow your process here. Thanks for posting the stages :)
Thanks for sharing your steps! I love the vintage feel of this! Beautifully done.
I love this series and hope you keep them up for quite some time. They are quite different from what many people do, and the local connection is very interesting,too. And this was a great demo and gave me some good ideas! June
I love this series of working men paintings... thank you for sharing your step by step photos on this one... I bet you're a GREAT art teacher, your students are very lucky.
Thanks for the step by step - for those of us just experimenting / learning to use watercolors this is very informative & helpful
Nina, thanks so much for the sequence photos. It's always interesting to see how someone works, especially you.
I have a Sceptre Gold II #8 that I use most of the time. The tip can make very fine lines, so I seldom use anything smaller. I go larger when needed, but the #8 is all I need for small sketchbooks when painting large and small areas.
A great learning experience for me. Thanks so much for sharing your techniques.
Great demo and a very interesting topic
I didn't know about using large brushes on such a small picture. I'll have to try that out. I tend to go small whether it's beadwork, drawing or whatever so this will be a challenge but perhaps a good one seeing what you do with your brushes. Thanks for sharing.
What a great idea for a series. I love practicing portraits but haven't had the courage to do them in wc. Your little progress pictures were very helpful and it was good to see how you got there in the end.
MD
Thanks for the step-by-step. I've recently come upon your blog and really enjoy it. Haven't used watercolors in too long, but you have inspired me.
The content you have provided is pretty interesting and useful and I will surely take note of the point you have made in the blog.
I thought this information might be useful for anyone looking for genuine nail decoration stuff and may not know where to buy them from.
Post a Comment