This is a long post, be prepared! Someone asked for a step-by-step of a painting, and that sounded like fun, so here goes:
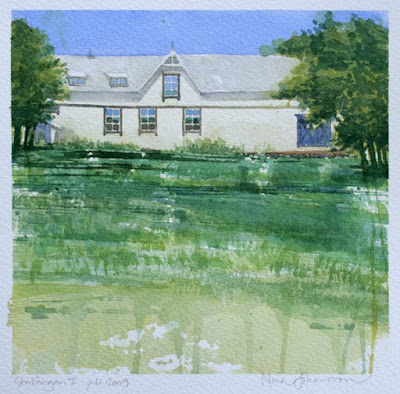
This is another painting of the stable in my last post, but from a slightly different angle. In this one I used some experimental techniques where I both print and paint the watercolours onto the paper. I like the unpredictable results of this, plus it takes away the fear of making mistakes on the expensive paper. The printing part is a bit uncontrollable so mistakes WILL occur, but they will probably not matter much in the end. Sort of a relaxing thought.
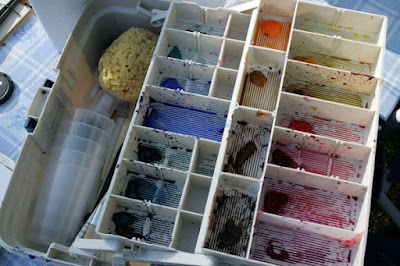
The first two pics show my setup and painting gear. This is NOT what I bring for sketching in my sketchbooks, since it is rather bulky stuff. I use this for paintings only.


I start out with a light pencil drawing of the building, just so I know where it goes in the painting. (Sometimes I start by "ruining" the paper with some printing, and THEN decide where the main motive will go.) I draw this either on location or from my own photos. I live very close to this place, so it´s easy to bring the paint board to draw on location.

This time I start with painting the sky, choosing a rather saturated blue - it will look much lighter when it´s dry, so I´m not too worried about using too much colour.

Then the fun begins: I choose a piece of wood (or masonite, or corrugated cardboard, or whatever I find lying around) and paint LOTS of wet colour onto it, then quickly turn it upside down and press it onto the paper. I lift it up, and if it looks good I go on to the next print, otherwise I might add more paint to this piece of wood, move it slightly sideways and print again.

When I´ve done two prints with two different wood pieces, I add some uneven strokes to the top of the print - giving a sense of grass or bushes.

When the first prints are dry, I find this very uneven piece of wood, which will probably give some interesting textures, so I print that on top of the other print, with a slightly darker colour. I also add a very light warm wash to the wall of the building.

I go on printing in layers, letting every layer dry before adding the next. If too much paint ends up in a puddle, I turn the paper to a standing position and hit the table with it to make the paint run off the paper downwards (or sideways). Makes the puddles go away, and leaves nice running marks, which I like a lot. I start building up some shadow under the edge of the roof.

Then it´s time to start painting the trees too, using both a sponge and a paintbrush. I don´t want to leave any surface of the paper blank until the end, I kind of want to be working on the whole surface the whole time. I think it´s easier to find balance in contrasts and colours working that way.

I start adding some details to the building, using paintbrushes. I deepen the shadow under the roof a little too. I like this contrast between splashy experimental style and detailed controlled painting.

Then I go on with more details on the house, adding the mirroring in the window panes and some details on the blue doors. I keep on working on the grass too, both printing and painting with an uneven paintbrush.

In the end I add some darker greens to the trees, and some shadow under them.

Pretty much finished. Here without the tape around the edges. You can see it leaked through a little on the left edge. No big deal, I think.

20 x 20 cm, pencil and watercolours on Saunders Waterford watercolour paper.


30 comments:
awesome step-by-step, and what an amazing technique! :) Love your work as always
Wow. . that was very cool. Thanks for posting! I like that you're not afraid to use whatever's laying around (wood, masonite, etc.) to make your painting more interesting.
It's always fascinating and informative to see how other artists approach their work. I like the mix of controlled and happy accident techniques in this painting. Thanks for letting us peek over your shoulder while you work! nancy
Thank you so much for putting this together! I too love the combination of your loose experimental techniques and controlled realism. Lovely to wtch the progression!
How lovely - thank you so much for sharing your ideas and techniques. I am getting to the stage where I want to be a bit more daring and take a few risks so shall perhaps try this.
Enjoyed seeing your process, and your work!
It was me who asked if you would post a step by step!
I had no idea how you achieved such interesting texture and looseness in your paintings. Thank you so much for posting this for all of us to enjoy.
Now I'm going to try some of your techniques in my own paintings.
Good luck, Jesse, and thanks for giving me the idea to do this - I enjoyed it! :)
Really cool, thank you for the demo!!
Wonderful! Thanks so much.
Oh, great demo! I enjoyed that! It looks beautiful, and I agree that the contrast is perfect between the more controlled and the free elements here. Fabulous! thanks for sharing that!
This is so thought-provoking. I am interested in learning different watercolor techniques & have been rather fascinated with the idea of printing too so this was really useful. Thank you. Also, I was surprised and happy to hear that you get nervous about using expensive paper too.:)
What a wonderful demo, Nina. Fascinating and such a beautiful result.
Thank you for sharing this demo!
Gorgeous! Your use of color and composition are beautiful. It is inspiring to see how varied and creative you can be with materials in watercolor, as well as with revealing the business of the water itself in embracing the streaking--I really like that. I am just beginning and wonder if you can comment on brushes--can you achieve such nice flow results with synthetic?
So generous to show us your painting tricks! Your work is stunning and as always inspires.
Joan Gillman Smith
http://www.flickr.com/photos/joangillmansmith/
Wonderful...THANKYOU!
Fantastic post! and great results :>)
@Saskia:
"I am just beginning and wonder if you can comment on brushes--can you achieve such nice flow results with synthetic?"
Thank you for your comment, I appreciate it.
About the brushes: I have two round sable brushes, one big and one slightly smaller, and they are unbeatable with their ability to hold water/colour so I use them for most of the washes and details. I use them every time I paint. For a nice flow with lots of paint they are the best, I haven´t found any synthetic brushes that can hold as much paint as they can. They cost a lot, but I only bought them once. I´ve had the big one for at least ten years.
BUT I do use some synthetics too, for experimenting and for tiny details. I don´t like working with small details, so I don´t want to lay a lot of money on small brushes, I just buy some noname brush with a reasonable price for small sizes. And then I use a lot of huge cheap brushes, goat hair or the kind you paint your house with, for laying down loads of paint on the wooden/masonite/cardboard/whatever pieces I print with. I NEVER do that with my sable brushes, I think it would wear them out pretty quickly.
Hope that answers your question. :)
The demo is great, detailed, teaching and inspiring, thank you! I will follow your blog as it is so interesting and full of ideas. Irina
What a spectacular post Nina...Thaks for sharing such a cool process! :)
Very coo,l Nina. It is wonderful to see how you produce your beautiful work.
Assoon as the weather gets warm enough I'm going outside to try this!
Thanks so much.
Thank-you so for this demo. For us that are learning on our own this means alot. May be a tree foliage demo?
Thank you so,
Linda
Hooray!!! Thanks for sharing! Never would have guessed about the block of wood.
Oh, yeah, and nice job on the painting. Really well done. But then, you probably already knew that.
Okay, this was incredibly inspiring. I only just started doing watercolour for this summer's holiday sketchbook, and it's been both fun and frustrating. I was planning on experimenting with different approaches to the images, but the sheer amount of unfamiliar territory (what with water, paint, brushes and all the colours one can mix) coupled with a lack of time has rather limited the scope. There's still more than half the sketchbook left, as I neglected to paint on only one side of each page, so maybe I can get a little experimental painting in before work starts again next week.
Thank you for sharing this! :)
Nina
this is lovely, thank you...
your work is so beautiful I always love to visit your blog.
Patty (blarneybytes)
I love step-by-step posts. Thanks for this! Lovely work (and such a beautiful setting).
Let me add my thank you too... I love seeing how other people do things... I love your tool box pallete.. (I use bargain basement dishes).. and a piece of wood... I've used sticks from the yard to lay down masking fluid (just throw them away when you're done)... but would never have thought of using something to 'print' the foreground. Thanks again.
Beautiful! Love the grass and the composition.
Post a Comment